

NextCloud搭建自己私有云盘
作者:众成 文章来源:运维部 点击数: 更新时间:2018-09-20 15:25:13
环境准备
Centos 6.x安装epel和webtatic最新仓库
[root@localhost admin]# yum -y install epel-release
[root@localhost admin]# rpm -Uvh http://mirror.webtatic.com/yum/el6/latest.rpm
Centos 7安装epel和webtatic最新仓库
[root@localhost admin]# yum -y install epel-release
rpm -Uvh https://mirror.webtatic.com/yum/el7/webtatic-release.rpm
1、安装nginx和php7
#安装nginx
yum install nginx -y
#安装php7及其nextcloud需要的包
yum -y install php70w-fpm php70w-cli php70w-opcache php70w-gd php70w-mcrypt php70w-mysql php70w-pear php70w-xml php70w-mbstring php70w-pdo php70w-json php70w-pecl-apcu php70w-pecl-apcu-devel
2、验证安装的php版本
[root@localhost admin]# php -v
PHP 7.0.31 (cli) (built: Jul 20 2018 17:59:11) ( NTS )
Copyright (c) 1997-2017 The PHP Group
Zend Engine v3.0.0, Copyright (c) 1998-2017 Zend Technologies
with Zend OPcache v7.0.31, Copyright (c) 1999-2017, by Zend Technologies
3、配置PHP7-FPM
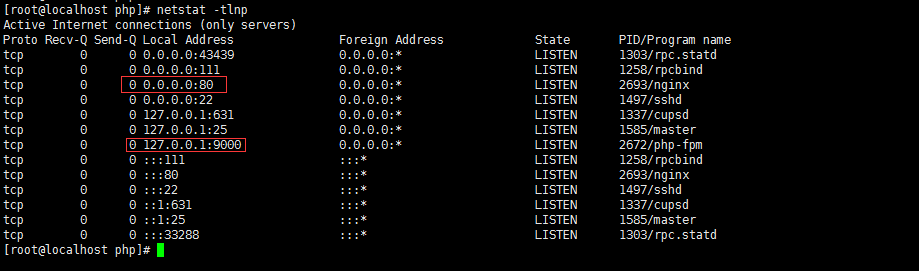
在这一个步骤中,我们将配置php-fpm与Nginx协同运行。Php7-fpm将使用nginx用户来运行,并监听9000端口。
使用vim编辑默认的php7-fpm配置文件。
[root@localhost admin]# vim /etc/php-fpm.d/www.conf
user = nginx
group = nginx #在第8行和第10行,user和group赋值为nginx。
listen = 127.0.0.1:9000 #在第 22 行,确保 php-fpm 运行在指定端口。
env[HOSTNAME] = $HOSTNAME
env[PATH] = /usr/local/bin:/usr/bin:/bin
env[TMP] = /tmp
env[TMPDIR] = /tmp
env[TEMP] = /tmp #取消第366-370行的注释,启用php-fpm的系统环境变量。
下一步,就是在/var/lib/php/目录下创建一个新的文件夹session,并将其拥有者变更为nginx用户。
[root@localhost lib]# mkdir -p /var/lib/php/session
[root@localhost session]# chown nginx:nginx -R /var/lib/php/session/
然后启动php-fpm和Nginx,并且将它们设置为随开机启动的服务。
Centos 6
[root@localhost php]# service php-fpm start
正在启动 php-fpm: [确定]
[root@localhost php]# service nginx start
正在启动 nginx: [确定]
[root@localhost php]# chkconfig php-fpm on
[root@localhost php]# chkconfig nginx on
Centos 7
systemctl start php-fpm
systemctl start nginx
systemctl enable php-fpm
systemctl enable nginx
4、安装和配置MariaDB
我这里使用MariaDB作为Nextcloud的数据库。可以直接使用yum命令从CentOS默认远程仓库中安装 mariadb-server包。
Centos6.x无法直接安装MariaDB
vim /etc/yum.repos.d/MariaDB.repo
# MariaDB 10.2 CentOS repository list - created 2017-07-15 07:23 UTC
# http://downloads.mariadb.org/mariadb/repositories/
[mariadb]
name = MariaDB
baseurl = http://mirrors.ustc.edu.cn/mariadb/yum/10.2/centos6-x86
gpgkey=http://mirrors.ustc.edu.cn/mariadb/yum/RPM-GPG-KEY-MariaDB
gpgcheck=1
安装MariaDB
[root@localhost yum.repos.d]# yum -y install MariaDB MariaDB-server
注意:如果有报以下错误,执行标黄部分
-----------------------------------------------------------------------------------------------------------------------------------
Total 2.0 MB/s | 73 MB 00:36
warning: rpmts_HdrFromFdno: Header V4 DSA/SHA1 Signature, key ID 1bb943db: NOKEY
Retrieving key from http://mirrors.ustc.edu.cn/mariadb/yum/RPM-GPG-KEY-MariaDB
Importing GPG key 0x1BB943DB:
Userid: "MariaDB Package Signing Key <package-signing-key@mariadb.org>"
From : http://mirrors.ustc.edu.cn/mariadb/yum/RPM-GPG-KEY-MariaDB
Running rpm_check_debug
ERROR with rpm_check_debug vs depsolve:
libkadm5clnt_mit.so.8()(64bit) is needed by krb5-workstation-1.10.3-65.el6.x86_64
libkadm5clnt_mit.so.8(kadm5clnt_mit_8_MIT)(64bit) is needed by krb5-workstation-1.10.3-65.el6.x86_64
libkadm5srv_mit.so.8()(64bit) is needed by krb5-workstation-1.10.3-65.el6.x86_64
libkadm5srv_mit.so.8(kadm5srv_mit_8_MIT)(64bit) is needed by krb5-workstation-1.10.3-65.el6.x86_64
You could try running: rpm -Va --nofiles --nodigest
Your transaction was saved, rerun it with: yum load-transaction /tmp/yum_save_tx-2018-08-15-16-07HQ2gUj.yumtx
[root@localhost yum.repos.d]# yum load-transaction /tmp/yum_save_tx-2018-08-15-16-07HQ2gUj.yumtx
启动MariaDB
[root@localhost init.d]# service mysql start
Starting MariaDB.180815 16:38:39 mysqld_safe Logging to '/var/lib/mysql/localhost.localdomain.err'.
180815 16:38:39 mysqld_safe Starting mysqld daemon with databases from /var/lib/mysql
. [确定]
[root@localhost init.d]# chkconfig mysql on
初始化MariaDB
[root@localhost init.d]# mysql_secure_installation
设置密码
Enter current password for root (enter for none):
OK, successfully used password, moving on...
Setting the root password ensures that nobody can log into the MariaDB
root user without the proper authorisation.
Set root password? [Y/n] y
New password:
Re-enter new password:
Password updated successfully!
Reloading privilege tables..
... Success!
By default, a MariaDB installation has an anonymous user, allowing anyone
to log into MariaDB without having to have a user account created for
them. This is intended only for testing, and to make the installation
go a bit smoother. You should remove them before moving into a
production environment.
Remove anonymous users? [Y/n] y
... Success!
Normally, root should only be allowed to connect from 'localhost'. This
ensures that someone cannot guess at the root password from the network.
Disallow root login remotely? [Y/n] y
... Success!
By default, MariaDB comes with a database named 'test' that anyone can
access. This is also intended only for testing, and should be removed
before moving into a production environment.
Remove test database and access to it? [Y/n] y
- Dropping test database...
... Success!
- Removing privileges on test database...
... Success!
Reloading the privilege tables will ensure that all changes made so far
will take effect immediately.
Reload privilege tables now? [Y/n] y
... Success!
Cleaning up...
All done! If you've completed all of the above steps, your MariaDB
installation should now be secure.
Thanks for using MariaDB!
[root@localhost init.d]#
这样就设置好了密码,现在登录到 mysql shell并为Nextcloud创建一个新的数据库和用户。这里我创建名为nextcloud的数据库以及名为nextcloud的用户,用户密码为nextcloud。当然了,要给你自己的系统选用一个更安全的密码。
[root@localhost init.d]# mysql -u root -p
Enter password:
Welcome to the MariaDB monitor. Commands end with ; or \g.
Your MariaDB connection id is 33
Server version: 10.2.17-MariaDB MariaDB Server
Copyright (c) 2000, 2018, Oracle, MariaDB Corporation Ab and others.
Type 'help;' or '\h' for help. Type '\c' to clear the current input statement.
MariaDB [(none)]>
MariaDB [(none)]> create database nextcloud CHARACTER SET utf8mb4 COLLATE utf8mb4_general_ci;
Query OK, 1 row affected (0.00 sec)
MariaDB [(none)]>grant all privileges on nextcloud.* to nextcloud@% identified by 'nextcloud';
MariaDB [(none)]> grant all privileges on nextcloud.* to nextcloud@localhost identified by 'nextcloud'; 不允许本地登录
Query OK, 0 rows affected (0.00 sec)
MariaDB [(none)]> flush privileges;
Query OK, 0 rows affected (0.00 sec)
5、为Nextcoud生成一个自签名SSL证书
我会让客户端以https连接来运行Nextcloud,这里我使用OpenSSL来创建自己的自签名SSL证书。
mkdir -p /etc/nginx/cert/
如下,使用openssl生成一个新的SSL证书。
[root@localhost init.d]# openssl req -new -x509 -days 365 -nodes -out /etc/nginx/cert/nextcloud.crt -keyout /etc/nginx/cert/nextcloud.key
Generating a 2048 bit RSA private key
............+++
..............+++
writing new private key to '/etc/nginx/cert/nextcloud.key'
-----
You are about to be asked to enter information that will be incorporated
into your certificate request.
What you are about to enter is what is called a Distinguished Name or a DN.
There are quite a few fields but you can leave some blank
For some fields there will be a default value,
If you enter '.', the field will be left blank.
-----
Country Name (2 letter code) [XX]:
State or Province Name (full name) []:
Locality Name (eg, city) [Default City]:
Organization Name (eg, company) [Default Company Ltd]:
Organizational Unit Name (eg, section) []:
Common Name (eg, your name or your server's hostname) []:
Email Address []:
最后使用 chmod 命令将所有证书文件的权限设置为 600。
[root@localhost init.d]# chmod 700 /etc/nginx/cert/
[root@localhost init.d]# chmod 600 /etc/nginx/cert/*
6、下载和安装Nextcloud
使用wget命令下载nextcloud到服务器上
[root@localhost /]# wget https://download.nextcloud.com/server/releases/nextcloud-12.0.0.zip
解压nextcloud,并将其移动到/usr/share/nginx/html/目录
[root@localhost opt]# unzip nextcloud-12.0.0.zip
[root@localhost opt]# mv nextcloud /usr/share/nginx/html/
转到Nginx的web根目录为Nextcloud创建一个data文件夹,推荐选择一个比较大的分区放置data目录,因为以后上传的数据都会放置在里面
[root@localhost opt]# cd /usr/share/nginx/html/
[root@localhost html]# mkdir -p nextcloud/data/
变更nextcloud目录的拥有者为nginx用户和组。
[root@localhost html]# chown nginx:nginx -R nextcloud/
7、在Nginx中为nextcloud配置虚拟主机
下载好了Nextcloud源码,并配置好了让它运行于Nginx服务器中,但我们还需要为它配置一个虚拟主机。在Nginx的conf.d目录下创建一个新的虚拟主机配置文件nextcloud.conf。
[root@localhost html]# vim /etc/nginx/conf.d/nextcloud.conf
将以下内容粘贴到虚拟主机配置文件中: (标黄部分,请修改为自己的域名)
upstream php-handler {
server 127.0.0.1:9000;
#server unix:/var/run/php5-fpm.sock;}
server {
listen 80;
server_name testcloud.com;
# enforce https
return 301 https://$server_name$request_uri;}
server {
listen 443 ssl http2;
server_name testcloud.com;
ssl_certificate /etc/nginx/cert/nextcloud.crt;
ssl_certificate_key /etc/nginx/cert/nextcloud.key;
# Add headers to serve security related headers
# Before enabling Strict-Transport-Security headers please read into this
# topic first.
add_header Strict-Transport-Security "max-age=15768000;
includeSubDomains; preload;";
#
# WARNING: Only add the preload option once you read about
# the consequences in https://hstspreload.org/. This option
# will add the domain to a hardcoded list that is shipped
# in all major browsers and getting removed from this list
# could take several months.
add_header X-Content-Type-Options nosniff;
add_header X-XSS-Protection "1; mode=block";
add_header X-Robots-Tag none;
add_header X-Download-Options noopen;
add_header X-Permitted-Cross-Domain-Policies none;
# Path to the root of your installation
root /usr/share/nginx/html/nextcloud/;
location = /robots.txt {
allow all;
log_not_found off;
access_log off;
}
# The following 2 rules are only needed for the user_webfinger app.
# Uncomment it if you're planning to use this app.
#rewrite ^/.well-known/host-meta /public.php?service=host-meta last;
#rewrite ^/.well-known/host-meta.json /public.php?service=host-meta-json
# last;
location = /.well-known/carddav {
return 301 $scheme://$host/remote.php/dav;
}
location = /.well-known/caldav {
return 301 $scheme://$host/remote.php/dav;
}
# set max upload size
client_max_body_size 512M;
fastcgi_buffers 64 4K;
# Enable gzip but do not remove ETag headers
gzip on;
gzip_vary on;
gzip_comp_level 4;
gzip_min_length 256;
gzip_proxied expired no-cache no-store private no_last_modified no_etag auth;
gzip_types application/atom+xml application/javascript application/json application/ld+json application/manifest+json application/rss+xml application/vnd.geo+json application/vnd.ms-fontobject application/x-font-ttf application/x-web
-app-manifest+json application/xhtml+xml application/xml font/opentype image/bmp image/svg+xml image/x-icon text/cache-manifest text/css text/plain text/vcard text/vnd.rim.location.xloc text/vtt text/x-component text/x-cross-domain-polic
y;
# Uncomment if your server is build with the ngx_pagespeed module
# This module is currently not supported.
#pagespeed off;
location / {
rewrite ^ /index.php$uri;
}
location ~ ^/(?:build|tests|config|lib|3rdparty|templates|data)/ {
deny all;
}
location ~ ^/(?:\.|autotest|occ|issue|indie|db_|console) {
deny all;
}
location ~ ^/(?:index|remote|public|cron|core/ajax/update|status|ocs/v[12]|updater/.+|ocs-provider/.+)\.php(?:$|/) {
fastcgi_split_path_info ^(.+\.php)(/.*)$;
include fastcgi_params;
fastcgi_param SCRIPT_FILENAME $document_root$fastcgi_script_name;
fastcgi_param PATH_INFO $fastcgi_path_info;
fastcgi_param HTTPS on;
#Avoid sending the security headers twice
fastcgi_param modHeadersAvailable true;
fastcgi_param front_controller_active true;
fastcgi_pass php-handler;
fastcgi_intercept_errors on;
fastcgi_request_buffering off;
}
location ~ ^/(?:updater|ocs-provider)(?:$|/) {
try_files $uri/ =404;
index index.php;
}
# Adding the cache control header for js and css files
# Make sure it is BELOW the PHP block
location ~ \.(?:css|js|woff|svg|gif)$ {
try_files $uri /index.php$uri$is_args$args;
add_header Cache-Control "public, max-age=15778463";
# Add headers to serve security related headers (It is intended to
# have those duplicated to the ones above)
# Before enabling Strict-Transport-Security headers please read into
# this topic first.
add_header Strict-Transport-Security "max-age=15768000;
includeSubDomains; preload;";
#
# WARNING: Only add the preload option once you read about
# the consequences in https://hstspreload.org/. This option
# will add the domain to a hardcoded list that is shipped
# in all major browsers and getting removed from this list
# could take several months.
add_header X-Content-Type-Options nosniff;
add_header X-XSS-Protection "1; mode=block";
add_header X-Robots-Tag none;
add_header X-Download-Options noopen;
add_header X-Permitted-Cross-Domain-Policies none;
# Optional: Don't log access to assets
access_log off;
}
location ~ \.(?:png|html|ttf|ico|jpg|jpeg)$ {
try_files $uri /index.php$uri$is_args$args;
# Optional: Don't log access to other assets
access_log off;
}}
下面测试一下该Nginx配置文件是否有错误,没有的话就可以重启服务了。
[root@localhost html]# nginx -t
nginx: the configuration file /etc/nginx/nginx.conf syntax is ok
nginx: configuration file /etc/nginx/nginx.conf test is successful
[root@localhost html]# service nginx restart
停止 nginx: [确定]
正在启动 nginx: [确定]
8、nextcloud安装
打开你的Web浏览器,输入你为Nextcloud设置的域名,然后会重定向到安全性更好的https连接。设置你的管理员用户名和密码,然后输入数据验证信息,点击 '完成安装(Finish Setup)'。
- 地址:温州市车站大道大诚商厦E幢四楼 | 电话:0577-88891333 | 技术服务电话:4008515159 | 传真:0577-88363999
- 邮箱:jucher@jucher.com | 浙ICP备05000620号-1
- Copyright © 2009-2019 JUCHER CORPORATION CO., LTD All Rights Reserve