

CentOS搭建NTP服务器
作者:众成 文章来源:运维部 点击数: 更新时间:2018-07-31 15:01:26
一、环境
ntpserver ip: 192.168.25.118
client pc ip: 192.168.25.120
二、准备工作
1、查看系统时间
[root@localhost /]# date
2018年 07月 25日 星期三 09:59:54 CST
查看硬件时间
[root@localhost /]# hwclock
2018年07月25日 星期三 10时00分25秒 -0.833260 seconds
注意:若发现时间和时区不对(正确的时区应为 CST),进行以下2-3步。
2、修改时区
[root@localhost /]# vim /etc/sysconfig/clock
# The time zone of the system is defined by the contents of /etc/localtime.
# This file is only for evaluation by system-config-date, do not rely on its
# contents elsewhere.
ZONE="Asia/Shanghai"
3、覆盖系统时间
[root@localhost /]# cp -a /usr/share/zoneinfo/Asia/Shanghai /etc/localtime
[root@localhost /]# date
三、搭建NTP服务
1、安装
[root@localhost /]# yum install -y ntp

![]() 2、检测上层服务是否连通,国家对时服务器有6个,可以使用下面3个
2、检测上层服务是否连通,国家对时服务器有6个,可以使用下面3个
1.cn.pool.ntp.org
2.cn.pool.ntp.org
ch.pool.ntp.org
依次测试上面3个服务器,结果如下
[root@localhost /]# ntpdate -q 1.cn.pool.ntp.org
server 85.199.214.101, stratum 1, offset 0.006010, delay 0.29118
server 46.227.200.24, stratum 2, offset 0.012499, delay 0.28981
server 120.25.115.19, stratum 2, offset 0.005314, delay 0.06325
25 Jul 10:27:54 ntpdate[3837]: adjust time server 85.199.214.101 offset 0.006010 sec
[root@localhost /]# ntpdate -q 2.cn.pool.ntp.org
server 139.162.66.25, stratum 2, offset 0.013905, delay 0.13853
server 5.103.139.163, stratum 1, offset 0.005822, delay 0.27800
server 69.60.114.223, stratum 2, offset -0.014529, delay 0.32114
25 Jul 10:28:15 ntpdate[3850]: adjust time server 5.103.139.163 offset 0.005822 sec
[root@localhost /]# ntpdate -q ch.pool.ntp.org
server 195.141.190.190, stratum 2, offset 0.020807, delay 0.29596
server 162.23.41.10, stratum 1, offset -0.002142, delay 0.25410
server 195.186.1.100, stratum 2, offset 0.015418, delay 0.30869
server 192.42.42.154, stratum 2, offset 0.017849, delay 0.30705
25 Jul 10:28:33 ntpdate[3852]: adjust time server 195.141.190.190 offset 0.020807 sec
3、校对当前时间
[root@localhost /]# ntpdate 1.cn.pool.ntp.org
25 Jul 10:30:10 ntpdate[3886]: the NTP socket is in use, exiting
注意:如果ntpd服务已经开启了,需关闭ntpd服务才可以使用
4、修改配置文件
[root@localhost /]# vim /etc/ntp.conf
添加标红标黄区域
# For more information about this file, see the man pages
# ntp.conf(5), ntp_acc(5), ntp_auth(5), ntp_clock(5), ntp_misc(5), ntp_mon(5).
driftfile /var/lib/ntp/drift
# Permit time synchronization with our time source, but do not
# permit the source to query or modify the service on this system.
restrict default kod nomodify notrap nopeer noquery //服务默认拒绝所有NTP连线
restrict -6 default kod nomodify notrap nopeer noquery //拒绝IPV6所有NTP连线
# Permit all access over the loopback interface. This could
# be tightened as well, but to do so would effect some of
# the administrative functions.
restrict 127.0.0.1 //允许本机访问
restrict -6 ::1 //允许本机访问
# Hosts on local network are less restricted.

![]() restrict 192.168.25.0 mask 255.255.255.0 nomodify notrap //允许192.168.25.0/24 网段的主机来进行对时,不允许客户端来修
restrict 192.168.25.0 mask 255.255.255.0 nomodify notrap //允许192.168.25.0/24 网段的主机来进行对时,不允许客户端来修
改,登录ntp服务器
# Use public servers from the pool.ntp.org project.
# Please consider joining the pool (http://www.pool.ntp.org/join.html).
#server 0.centos.pool.ntp.org iburst #server 1.centos.pool.ntp.org iburst #server 2.centos.pool.ntp.org iburst #server 3.centos.pool.ntp.org iburst
server 1.cn.pool.ntp.org
server 2.cn.pool.ntp.org prefer //prefer优化使用
logfile /var/log/ntp.log
#broadcast 192.168.1.255 autokey # broadcast server
#broadcastclient # broadcast client
#broadcast 224.0.1.1 autokey # multicast server
#multicastclient 224.0.1.1 # multicast client
#manycastserver 239.255.254.254 # manycast server
#manycastclient 239.255.254.254 autokey # manycast client
# Enable public key cryptography.
#crypto
includefile /etc/ntp/crypto/pw
# Key file containing the keys and key identifiers used when operating
# with symmetric key cryptography.
keys /etc/ntp/keys
# Specify the key identifiers which are trusted.
#trustedkey 4 8 42
# Specify the key identifier to use with the ntpdc utility.
#requestkey 8
# Specify the key identifier to use with the ntpq utility.
#controlkey 8
# Enable writing of statistics records.
#statistics clockstats cryptostats loopstats peerstats
~
~
5、同步更新hwclock
[root@localhost /]# vim /etc/sysconfig/ntpd
SYNC_HWCLOCK=yes
6、启动ntp服务
[root@localhost /]# service ntpd start
正在启动 ntpd:
7、查看与上层服务器连接状态
 [root@localhost /]# ntpq -p
remote refid st t when poll reach delay offset jitter
==============================================================================
+120.25.115.20 10.137.53.7 2 u 118 256 377 38.010 2.636 0.603
-uk.cluster.ntp. 185.134.196.169 2 u 245 256 137 265.832 9.522 34.387
+120.25.115.19 10.137.53.7 2 u 111 256 377 34.721 2.712 1.531
*85.199.214.100 .GPS. 1 u 20 64 377 257.047 -8.298 13.204
说明:*表示目前正在使用的上层NTP,+表示已连线,可提供时间更新的候补服务器
8、确认已进行同步
[root@localhost /]# ntpstat
synchronised to NTP server (85.199.214.100) at stratum 2
time correct to within 146 ms
polling server every 256 s
9、加入开机启动
[root@localhost /]# chkconfig ntpd on
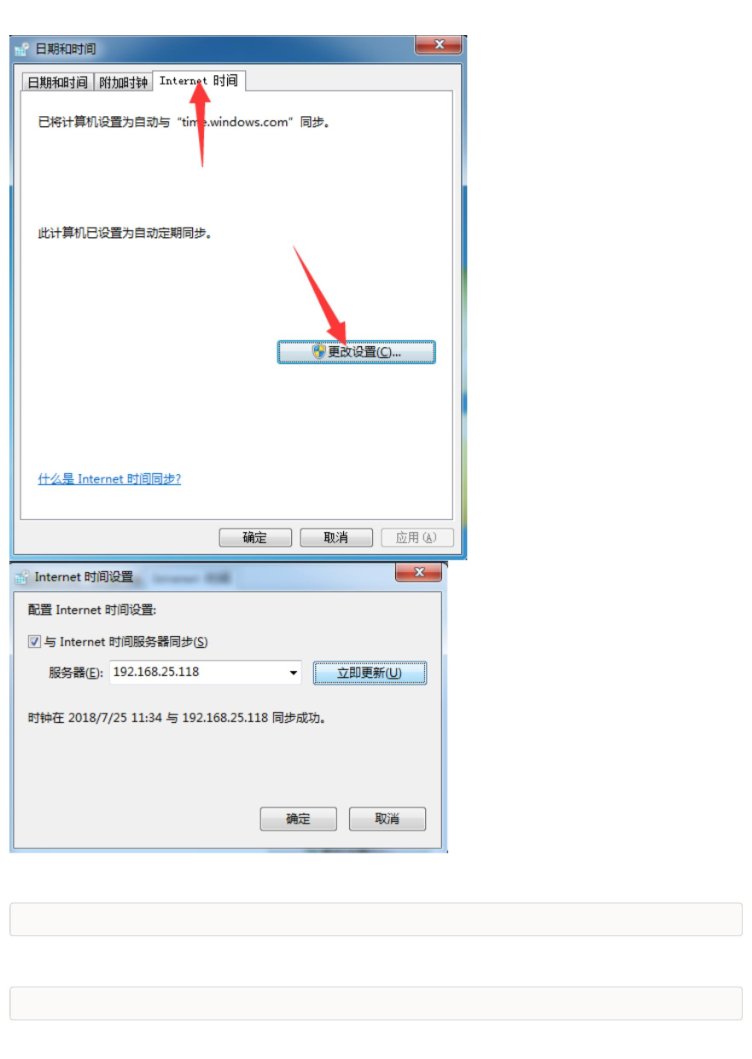
四、客户端设置
1、windows客户端
 2、linux客户端
[root@localhost /]#ntpdate 192.168.25.118
加入任务计划
[root@localhost /]#crontab -e
 0 1 * * * /usr/sbin/ntpdate 192.168.25.118
- 地址:温州市车站大道大诚商厦E幢四楼 | 电话:0577-88891333 | 技术服务电话:4008515159 | 传真:0577-88363999
- 邮箱:jucher@jucher.com | 浙ICP备05000620号-1
- Copyright © 2009-2019 JUCHER CORPORATION CO., LTD All Rights Reserve